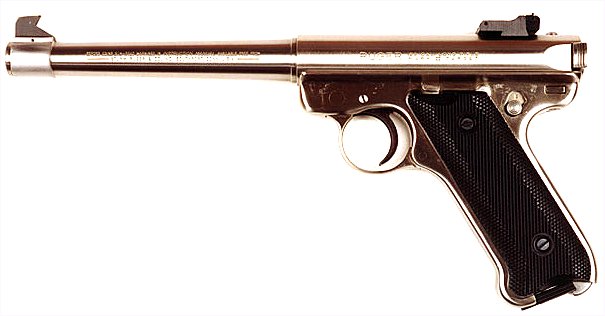
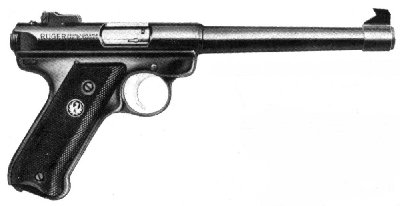
RUGER MK II & 22/45 SPORT PISTOLS

While purists will cringe at the Ruger being included with UIT target pistols, many shooters start out with the Mark I or Mark II, and unless the original instructions are retained reassembly is a nightmare. Enjoy!
Sight Adjustments
Clockwise down.
Clockwise left.
Stripping
Remove mag. Check chamber is empty. Close slide and pull trigger. Hammer must be uncocked before disassembly.
Insert a blunt “pointed” instrument in the oval recess of the mainspring housing (at the back of the grip) and swing the housing latch open like the blade of a pocket knife.
Swing the entire housing outward on its pivot and pull downward, removing mainspring housing and bolt stop pin. With new pistols it may be necessary to lightly tap (with plastic hammer) on the top portion of the bolt stop pin – which protrudes above the receiver – while pulling down on the mainspring housing.
Point muzzle up. The bolt will drop out of the receiver or it can be readily removed.
With the mainspring housing/bolt stop pin (as an assembly) and bolt removed, a forward blow (with plastic hammer) on the rear of the receiver will disengage the barrel-receiver assembly from the grip frame. No attempt should be made to remove rivets or staked pins.
Reassembly
Check chamber is empty. Place safety on “F”. Place hammer in horizontal (cocked) position. Keep finger off trigger.
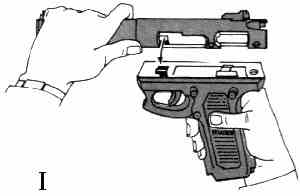
Place barrel receiver on top of frame so that the square lug engages the square front recess on the underside of the receiver (fig I).
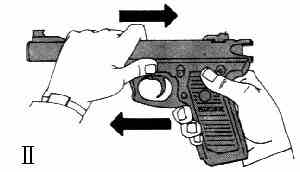
Push barrel rearward until it stops, with the rear end of receiver slightly overhanging the rear of the grip (see fig II). If alignment cannot be achieved by hand pressure, strike the muzzle (front) of the barrel with a plastic or wood mallet only, being careful not to damage the muzzle.
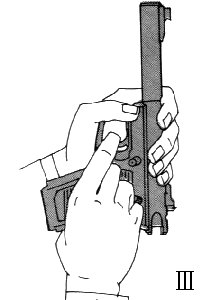
Point muzzle up and pull trigger. Gravity will cause the hammer to return to its cocked position if it became dislodges in step 1. (See fig III).
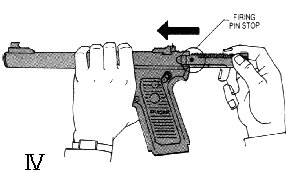
Slide bolt (recoil spring upward) fully into receiver. NOTE: Before sliding bolt into receiver, be certain that the firing pin stop is in the bolt. Without this pin, the first time the trigger is pulled on an assembled pistol, the firing pin will fly so far forward so as to irreparably dent the rear end of the barrel, making the pistol useless. (See fig IV).
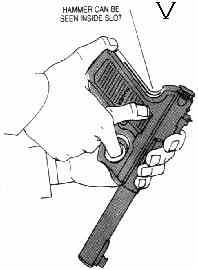
Point muzzle toward ground. Angle the rear of the pistol forward and slightly downward, and pull trigger. Gravity will now cause the hammer to fall to its uncocked position. You can see the hammer fall into this position through the slot in the rear of the grip frame, and when the hammer falls, you will hear a “click”. This is essential to all later reassembly steps. Release trigger. (See fig V).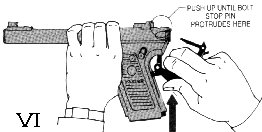
Hold the pistol and the mainspring housing bolt stop pin assembly in a horizontal position and press bolt stop pin upward through the holes in the receiver and bolt until the tip of the pin protrudes beyond the top of the receiver. (See fig VI). Pin must be fully in place to close latch in final step.
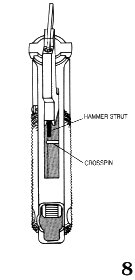
(Not applicable to 22/45 models only) Always make sure you can see the hammer strut hanging down inside the housing slot (see fig 8). Make sure the hammer strut is free to move and not “trapped” behind the crosspin inside the grip frame. If it is, point the muzzle forward and pull the trigger again. If necessary, gently move the hammer strut over the crosspin with a small screwdrive blade.
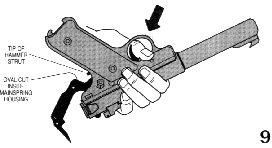
Invert the pistol as shown and depress the trigger with your thumb. Hold the pistol as shown in fig 9.
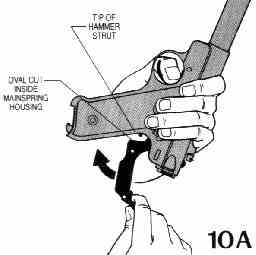
Make sure you can see the end of the hammer strut when you lift the housing up (see fig 10A). The hammer strut should go into the oval-shaped cut inside the mainspring housing. Spring pressure should be felt just before the housing is fully shut if the internal parts are correctly aligned.
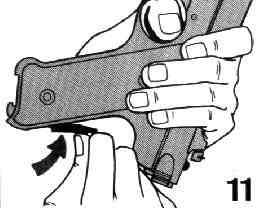
The housing latch can now be snapped shut, completing reassembly. To determine if reassembly is correct, pull bolt back. It should open fully. If not, mind your language, remove mainspring housing and start again.
Pistol should not be stored with hammer in cocked position.
More Useful Tips from Ruger
If you are having difficulty reassembling the pistol:
– If the hammer strut does not contact the plunger inside the mainspring housing as it is swung shut, it will either be impossible to close the housing, or the housing will close but the bolt cannot be fully opened. Make sure strut is free, hammer is uncocked, and repeat steps V-11 above.
– If the mainspring housing pulls out of the gun when swung in, the barrel/receiver assembly is not fully rearward on the frame (fig II).
– Remember that it is essential that the hammer must be in its vertical, uncocked, position as the mainspring housing is swung shut. If the housing is excessively difficult to close, the hammer is probably cocked. Repeat steps VI-11 above.
– The foregoing may give the impression that reassembly is difficult, but it is quickly and easily done once properly learned.
More Useful Tips from Warren
If problems persist, sing Ave Maria quietly to yourself in Latin, contact your doctor for a course of Prozac and sell the gun.