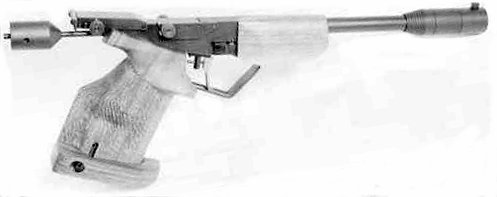
TAU 7
IMPORTANT NOTE: Always cock pistol prior to filling with gas.
Sight Adjustment
NOTE: English instructions in manual are incorrect.
Right hand knob for elevation – clockwise up.
Left hand knob for windage – clockwise left.
1 click = 2.4mm @ 10m.
Trigger Adjustments
Trigger Weight
This is adjusted by the vertical screw in the front of the trigger guard. Despite appearances this does not hold the trigger guard in place. Turn clockwise to increase weight.
1st & 2nd Stages
The trigger is factory-adjusted for two-stage travel. Single stage can also be set up.
– To set for two-stage, follow these directions. First, check pistol is unloaded. Cock the action, then turn screw 47C clockwise slowly until the sear releases. Then turn this screw counter-clockwise one full turn. Do the same with screw 47B, but this time unscrew it one and a half turns.
– To set for single stage, you would not turn screw 47B clockwise one full turn. Generally speaking, turning screws 47B and C result in shortening trigger travel. Be cautious of leaving too little travel, as this may not give enough sear engagement and may be unsafe.
– When fine adjusting, do not turn any screw more than ¼ of a turn at a time. Always check by dry firing. If you find the pistol will not fire, trigger stop screw 47A may be screwed in too far, or either 47B or C may not be screwed in enough. Obviously if 47B or C are screwed in too far there will be no sear engagement, and pistol will not cock.
Trigger Stop
The trigger stop screw (47A) is located behind the trigger bar. To set this, first screw it at least a full turn clockwise. Then cock the action and slowly turn this screw counter-clockwise while putting pressure on the trigger, until the shot releases. You may need to turn a further 1/8 counter clockwise to give enough clearance so that the stop does not interfere with trigger release.
Adjusting Muzzle Velocity The factory adjusts this to an optimum of roughly 470fps with match pellets. It is not recommended to adjust this unless velocity has obviously fallen to an unacceptable level. Screw 20 will adjust velocity, and may be accessed by loosening the set screw holding the fore-wood in place and sliding it down the barrel. By turning screw 20 clockwise the hammer spring tension is increased, thereby hitting the gas valve harder and holding the valve open longer (resulting in more velocity). When reset it is a good idea to put a little nail varnish on the thread to stop it from self-adjusting.
To load the pistol
– Open the loading gate by pushing forward on the twin lugs on the gate, and lifting it up and forward.
– Seat a wadcutter pellet into the barrel, making sure the skirt does not protrude to the rear.
– Close the loading gate by tilting it down and pushing it until a click is heard. Now pull rearward on the loading gate lugs to ensure it has closed securely. Failure to do so, could result in the loading gate flying open when fired. This is not dangerous, but you will probably lose two o-rings from the loading gate. It could also round out the locking wedge, making it more likely to happen in the future.
– Cock the action by pulling forward on the twin cocking levers (they will click in place).
– On squeezing the trigger the striker is released, opening the gas valve, pushing the pellet down the barrel (pellet is fired).
To charge the gun from bulk bottle
– Ensure pistol is unloaded.
– Make sure there is no gas capsule in the gas compartment (inside the grip).
– Attach the relief valve fitting to the rear of the gas compartment (this is the fitting with a coarse male thread protruding). Use cylindrical spanner provided.
– Cock the action (pull forward on the twin cocking lugs). This takes spring tension off the valve; failure to do so may result in loss of gas through the valve seat, then the barrel.
– Remove the plastic cover on the relief valve fitting. Turn pistol upside down, making sure it remains pointing in a safe direction. Then screw on the 125 gram bottle – there will be a hissing noise as gas transfers. You may then dry fire 2 or 3 times, expelling gas – this will aid filling. Position should be held for 30 seconds to 3 minutes before unscrewing 125 gram bottle. Best results are attained for complete filling when the gray bottle is slightly warmer than gun itself. Leaving the gray bottle in direct sunlight for 15 minutes should be sufficient with the gun at room temperature.
– Pistol should now be charged.
To use 12 gram capsules
– Ensure pistol is unloaded.
– Make sure there is no gas capsule in the gas compartment (inside the grip).
– Cock the action (pull forward on the twin cocking lugs). This takes spring tension off the valve; failure to do so may result in loss of gas through the valve seat, then the barrel.
– Take one of the two piercer fittings.
– Place a 12 gram capsule inside the gas compartment, with neck toward the opening.
– Screw on a piercer fitting using the cylindrical spanner provided. There may be a hissing sound as the capsule is pierced, and the gun pressurized.
– Point the gun in a safe direction and dry fire. If gas is expelled, the gas compartment is charged. If not, try tightening the piercer fitting further.
– Depending on velocity setting, the TAU 7 should deliver 50-80 shots per 12 gram capsule.
– When changing capsules, you should first empty the gas compartment. This can be achieved by pulling rearwards on the twin cocking lugs. If there is still a lot of gas pressure, this may be difficult. Using both hands, hook an index finger over each lug, hook thumbs around the rear of the grip, and lever the cocking lugs rearwards until all gas discharges through the barrel.
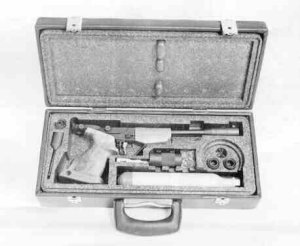
– The piercer fitting will now be cold. The pistol is supplied with two of these so that you will interchange them when re-gassing. Use the “warm” piercer fitting to recharge the pistol. Otherwise the cold fitting may not seal, and will possibly damage the o-ring. The o-ring in this state is swelled from the CO2 and may take several hours to revert to normal size.
– A very small amount of silicone grease should be applied to insides of the pressure vessel (5) where the o-ring from the cap slides. This should be done infrequently as needed.
TAU 7 Dry Fire Mechanism
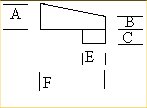
Side View
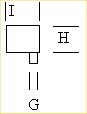
Front View

Hold down spring if necessary
Make out of hard rubber or delrin. Make two of these things, then insert one in each side of the pistol behind the cocking slide. Trim the dog that fits into the groove for the cocking mechanism last so that you get a pressure fit. If you do not get a pressure fit make a spring out of the steel rods they sell in hobby shops to make model airplane landing gear to hold the cocking lever stop in place.
Scale = inches
A = 1/4″
B = 1/8″
C = 1/8″
E = 3/16″
F = 1/2″
 G = 1/8″
H = 1/4″
I = 5/16″
Courtesy of Lanning Hochhauser
lanningh@datair.com
Exploded View