WALTHER LP 300
Sight Adjustments
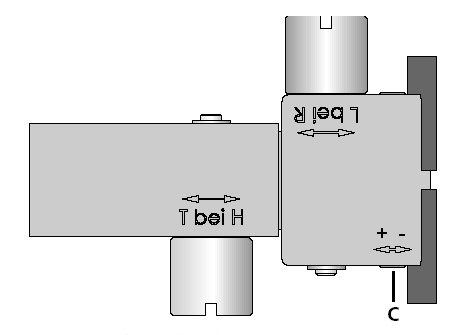
Clockwise down.
Clockwise left.
Width of rear sight notch can be widened or closed by turning screw C.
Setting the Trigger
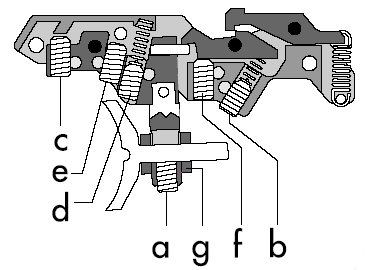
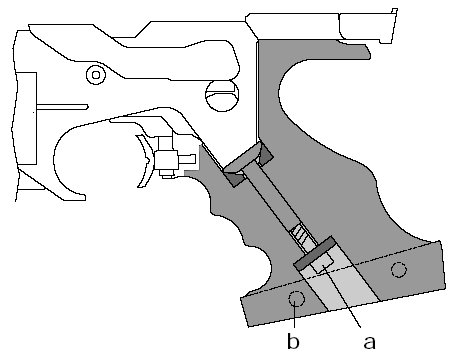
The trigger has been set optimally at our works. Before setting, remove the finger rest. Adjusting the finger rest (a, g) The finger rest is height adjustable, can be adjusted longitudinally and can be swivelled. For adjusting the finger rest remove the screw (a), for height adjustment take out the finger rest and turn the screw socket to the left, respectively to the right, then insert the finger rest again into the screw socket, position and clamp it with the screw. Check the trigger weight after height adjustment of the finger rest.
Trigger Pull (b)
Turn anti-clockwise for reduced pull, and clockwise for greater pull.
Trigger Slack (c)
Turn anti-clockwise to increase first stage travel, and clockwise to reduce it.
Trigger Weight (d)
Turn anti-clockwise to increase the weight, and clockwise to reduce it.
Trigger Stop (e)
Turn clockwise to reduce second stage travel, and anticlockwise to increase it.
Sear Engagement (f)
With the pistol cocked, the screw is slowly turned clockwise until the sear releases. Then turn the screw anticlockwise for about 1/4 to 1/2 turn.
Training Trigger

When cocked, the pistol can be set to the training mode by operating the slide. Note the marking.
The marking indicates the setting of the trigger.
T = Dry-practice trigger
F = Shooting position
Grip
The correct position of the pistol in the hand is essential for successful shooting. The hand must enclose the grip comfortably but firmly without clenching or cramping.
The hand support can be made to fit the hand. To adjust it, the screws (b) are undone and then retightened after adjustment.
The grip can be freely adjusted, without being removed, to any position and in any direction thanks to a ball joint; to do so, slightly loosen screw (a). After the setting, retighten screw (a).